Chilli Growing

Getting Started
 Don't delay, sow seeds early to get ahead and ensure fruits will ripen.
First thing is to get organized, so get some label sticks and an indelible pen, as it is too easy to muddle the whole lot up once they start germinating. A bag of potting compost and some kind of seed tray, whether its just a plain tray, cell blocks or jiffy pellets. Jiffy pellets are probably the easiest and best option, they have got got everything you require for seed germination, there's enough nutrient and compost to keep the seedling going until it’s got a good healthy root system. Soak them for approximately five minutes depending on water temperature and pop the seed in. As with all seedlings do not over soak them as this will restrict the root growth, and could eventually kill the seedling. For a good greenhouse crop you will need a fairly long season especially on the hotter (Capsicum chinense) varieties, so aim to start sowing seeds in Feb/March, or earlier if you have means of extra light and heat. If using cells sow in about 3 cm cells with 2 seeds in each and thinly cover in compost. Pre-soaking the seeds may help getting some harder to germinate ones going. Germination can then take up to 6 weeks depending on variety, in a temperature of 75ºF - 85ºF, although the majority of seeds germinate in the first 2 weeks. Higher temperature can be used giving quicker germination, but overall germination percentage may then be lowered. Light is no factor in germination. Electric heated propagators help, and start at about £20 from the larger DIY stores for a basic tray with heat, if you want better precise control over the heat, use one with a thermostat, these will obviously cost a bit more. If you haven't a heated propagator cover your seed tray with cling film which will hold the heat in and humidity up and place in airing cupboard, on top of a boiler or somewhere near a radiator, keep a regular check on them, because as soon as the seedlings are up they will then need maximum light to stop them going straggly and getting weak.
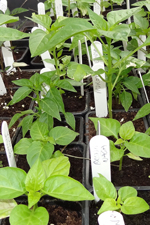
 When they are large enough to handle, about 4 true leaves, gently lift them by their leaves and pot them into individual 5 cm pots discarding any weak plants, try not to disturb the roots too much, and give them a weak nitrogen liquid feed to maintain growth, or you can now use a dedicated chilli nutrient feed, such as chilli focus, the nitrogen will promote leaf growth and will green up its leaves.
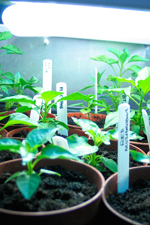
The plants will still need a minimum temperature of about 60ºF, so will need to be kept indoors, or outdoors in a larger heated propagator or heated greenhouse. Artificial lighting is now beneficial to maintain a sturdy healthy growing plant, in poorly lit conditions they will quickly grow tall and thin and start to keel over.
When they are large enough to handle, about 4 true leaves, gently lift them by their leaves and pot them into individual 5 cm pots discarding any weak plants, try not to disturb the roots too much, and give them a weak nitrogen liquid feed to maintain growth, or you can now use a dedicated chilli nutrient feed, such as chilli focus, the nitrogen will promote leaf growth and will green up its leaves.
The plants will still need a minimum temperature of about 60ºF, so will need to be kept indoors, or outdoors in a larger heated propagator or heated greenhouse. Artificial lighting is now beneficial to maintain a sturdy healthy growing plant, in poorly lit conditions they will quickly grow tall and thin and start to keel over.
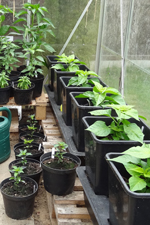
After about 8-12 weeks they should now be large enough to transplant which can then be left in an unheated greenhouse or outdoors if weather is suitable, leave about 30-40 cm between plants. Small ornamental plants will grow quite happily in 2-3 litre pots as they may only reach 40-50 cm high with a good crop on, but other bigger bush types will need at least a 5 litre pot, and support so they don't topple over, but for a larger bush and maximum cropping they like to be planted straight into the ground in the greenhouse. The advantage of pot growing is they can be moved around. Now weather and variety depending, they will grow to over a metre high, although they can be encouraged to bush out by pinching out the growing tip when 15 to 20 cam’s tall if they look like they are going to grow into a tall stick. Probably the only ones that will need a pinch out are the annums, this will help with bushing and giving a greater amount of chillis on the bush. Always keep well watered, but not saturated, especially if they are grown in pots or grow bags, as they tend to dry out fairly quickly, erratic watering will lead to problems such as blossom end rot or cracking of fruits. Mist the plants regularly to keep down pests and encourage fruit set. Once flowering and fruit has begun to set a potash feed (tomato food) will be beneficial, with every other watering, this will help with forming and developing the flowers, and swelling and ripening the fruit. On heavily laden plants some kind of support will be necessary to hold the weight of the chillis, either use canes up the main stalk or wire across the greenhouse with string hanging down which can be twisted around the stems as they grow.
Artificial Lighting
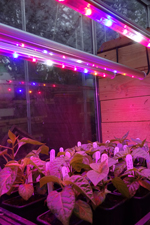
Artificial lighting for plants, or Grow Lighting as it’s also known, is becoming increasing popular in all forms of horticulture. It can be used to extend the growing season outdoors, or as a complete source of light for indoor growing.
(courtesy Tom Green of GreensHorticulture)
Choosing the right grow light can look a little bit daunting at first, but is in fact very easy when armed with some basic knowledge. The two main types of grow lighting commonly used with Chilli’s are Compact Fluorescent Lighting (CFL) and High Intensity Discharge (HID) lighting.
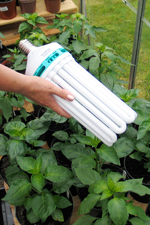 Compact Fluorescent Lighting (CFL), CFL lights are available in blue (Daylight 6400K) and red (Warm White 2700K) spectrum, and in four different wattages between 125W and 250W. The blue spectrum lamps are by far the best selling of the two, they’re excellent at all forms of propagation and early stage plant growth - chilli’s seem to be especially suited to this type of light . A basic lamp and reflector starts at around £40.00 for a 125W version or £60.00 for the 200W version, twin lamp reflectors with 200W lamps can cost as much as £150.00. Red spectrum CFL’s are something and nothing, they do an average job as a complete light source for chillis in indoor areas with no sunlight at all, they can at least keep plants growing. However, even the most powerful red spectrum CFL lights seem to struggle with making chillis flower properly, for this purpose you should really look at HPS lighting.
If what you want from a grow light is to be able to get a handful of healthy young chilli plants ready to be planted outdoors early in the summer, then the blue spectrum CFL lights are the natural choice. The 125W does a reasonable job over a smaller propagator, but if you really want to get things moving quickly then the 200W and 250W versions are much better. Don’t forget that you will also need a timer to turn the light on and off, up to 250W can be safely run off a normal household segmental timer, with most chillis responding well to 14-16 hours light per day. There is now also purple CFL version (Bio Tropic 2500K), this lamp will do all stages of the plants life cycle because it produces light from both ends of the spectrum. Blue benefits growth and red benefits bloom, so fit purple and your plants will get the full range!
 High Intensity Discharge (HID), Lighting As with CFL lights HID lighting are also available in blue (Metal Halide - MH) and red (High Pressure Sodium - HPS) spectrum. However, they are generally more powerful than CFL lights and this makes them more suitable for covering larger areas, or for replacing sunlight all together. Metal Halide lamps are effectively the next step up from CFL lamps for propagation and early stage plant growth. CFL Where CFL lamps need to be used as close to plants as possible and therefore will only really cover the area directly under the reflector, MH lights put light down over a larger area, around 1square metre for the top selling 400W version. Typically this light would be used by people looking to establish larger numbers of plants into their final growing pots before putting them outdoors, or as a total source of light in indoor situations for early stage growth before switching over to HPS light for flowering. Prices for the 400W versions start from around £70.00 for a decent quality budget system, but you can pay as much as £150.00 for a high end version with quality reflector. High Pressure Sodium Lamps should only really be used with chillis for flowering, although they will make a plant grow in the early days, but the growth tends to be leggy and uncontrolled. Because of this HPS lights are generally used as a complete source of light for chillis grown indoors, the 400W and 600W versions are the top sellers. Wherever possible these lights should be purchased with Grolux lamps, these have been slightly tweaked for horticultural use and chillis generally seem do slightly better under them. Expect to pay around £70.00 for a basic 400W version, the sky’s the limit for high end 600W versions. Both MH and HPS grow lights of 400W and above will require a special timer unit to turn them on and off, if you try to use a normal household it will normally fuse together and stop working. Ask your retailer which product is suited to the light you plan to buy, they start from around £20.00 for a one light controller.
 Light Emitting Diode (LED) Lighting, Still in its infancy for the mass market, (written April 2010), they do look like the energy efficient way forward to light up your plants. LED lighting is actually a cluster of individual units. Many of these produce white light but others generate light of other wavelengths, and although for coverage LEDs are initially somewhat more expensive than conventional HID lighting at the moment and only available in small blocks, the overall savings on your electric bill and the long life (approx ten years depending on use) should make up for this. LEDs roughly use only 20% to 30% of the electricity of conventional HID lighting depending on the colour of the LED and will run warm rather than hot so will not need cooling. As with all the other plant lighting it now comes down the wavelength part of the spectrum which is useful to the plants. Blue LEDs speeds up leaf development, plant growth and provides maximum plant health while the Red LED lighting will trigger bud development, flower blossoming and fruit growth. Recent technology also now includes full spectrum LEDs that are for accelerating growth and flowering to use throughout the season. All LEDs turn on instantly and can be used with standard timers to give your plants 14-16 hours lighting a day which probably makes them a good choice for home hobbyists, also being more rugged in durability as they have no fragile filament to contend with, and no fragile tube, they are resistant to heat, cold, and shock.. For a more detailed read on LEDs visit gizmology.net/LEDs.htm
Lighting FAQ's
Q. How much do these lights cost to run?
A. Electricity is charged per 1000 watts per hour (kilowatts), so a 400 watt light uses 40% of one Kilowatt hour. If you’re paying 10 pence per kilowatt hour, you will therefore pay 4 pence for each hour that the light is turned on. Putting a timer onto the lighting system and running the lights overnight will obviously keep the cost down if you are on a day and night rate. growtips10
Q. Are grow lights safe?
A. Very, as long as you buy from a reputable retailer and use a timer unit where applicable. Bear in mind that with HID lighting the lamps become very hot when in use, so make sure children and pets do not have access to them.
Q. All I want is something to get my seedlings going earlier in the season, which light is best for me?
A. CFL blues are perfect for this and reasonably priced, always go for the 200W if finances allow.
Q. I want to grow chillis year round indoors, which lights do I need?
A. If you’re feeling flush then get a blue CFL light to get them started, then switch to metal halide to bring them on to the point where you would like to flower them, then switch over to high pressure sodium. Have a look around for “combi deals” on grow lights, some retailers include both MH and HPS lamps at a discounted rate on certain grow lights.
Q. What’s the difference between a budget grow light for £70.00 and a high end one for £150.00?
A. Believe it or not, it’s normally just the reflector. High end reflectors have been optimised to spread the light and lamp heat out over a wider area, budget reflectors tend to concentrate the light directly under the lamp, which occasionally be too much for these plants and cause heat stress. However, in reality the very high end reflectors tend to be used for higher value crops and research, most budget versions are fine for chillis.
Q. I’ve seen it mentioned that you should use ventilation in indoor growing areas where HID lights are used, why is this?
A. If you use HID lights in confined spaces heat build up can be a problem, especially with 600W versions and above. In this case it makes sense to use a small extractor fan of some kind to remove some of the hot air and keep the air in the area fresh and full of CO2, this can become depleted quite quickly in indoor growing areas.
Q. I’ve seen a lot of talk about digital grow lights on the internet, are they as good as all the websites make out?
A. No, not really, claims they use less electricity are thoughtless at best, if you see a website using this as a selling point be very careful when dealing with the company, they are either ill informed or unethical. Certain Digital ballast used in conjunction with certain lamps can produce higher outputs, but you’ll always end up using more electricity to do so – it’s a straight forward law of physics.
Hydroponics
"the cultivation of plants by placing the roots in liquid nutrient solutions rather than in soil;
soil-less growth of plants"
Info Guide to all Hydroponics courtesy of Jonathan Ellins of Tropicana Horticulture
This method is where you grow the plants in a nutrient rich water solution, which is given directly to, and absorbed by the bare roots. Plants grown in hydro systems soon develop strong healthy roots, have easy access to oxygen, water and nutrient, and therefore overfeeding and under-feeding is prevented. Plants grow a lot faster with this method than they would in a normal soil bed. They are also healthier, making them more resistant to pests and diseases. There are no soil-borne diseases, no weeding and the plants can be placed very close to one another, this will allow for a large amount of chillis to be produced in a small amount of space. In this method of growing the soil is replaced with an inert substance such as vermiculite, perlite, clay granules, gravel, coir fibre, or cocoa bean shell, which is there just to support the plant. Nutrients, mostly combinations of nitrogen, potassium and phosphate with other trace elements such as calcium, magnesium and sulphates, are delivered as a solution directly to plant roots.
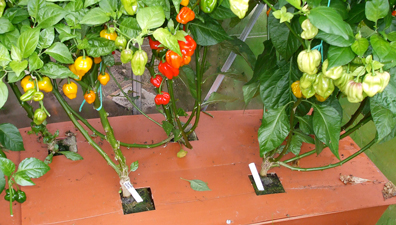 Hydro systems can be active or passive, (i) active systems are where the water and nutrient is automatically pumped from a reservoir, around the plant roots. Nutrient film technique (NFT) is where the plants grow in a plastic tray which is gently sloping, a constant flow of nutrients is maintained along the tray, and the roots grow into dense mats, with a thin film of nutrient passing over them, the nutrients the plant does not take, is drained back into the reservoir, and circulated around again via a small submersible pump, the tank is then periodically changed with fresh nutrient solution. In an Ebb & Flood system a nutrient solution is pumped at pre-set intervals from the reservoir over the roots and back into the reservoir over and over again. (ii) Passive systems are much simpler, your plant is placed in a container (pot or bag) of growing medium, and the container stands in a tray of nutrient solution. For more information on the system we used,which can be seen on the 2004 growing diary visit, greenhousesensation.co.uk or for a more overall picture of complete hydroponic with a range of systems visit, hydroculture.co.uk. There are 6 basic types of hydroponic systems, Wick, Deep Water Culture, Ebb and Flow (Flood & Drain), Drip (recycle or non-recycle), N.F.T. (Nutrient Film Technique) and Aeroponic, There are hundreds of variations on these basic types of systems, but all hydroponic methods are a variation (or combination) of these six. Visit the guide link below to see a more detailed explanation with diagram guides.
Problems & Pests
Diseases are not that common on chilli peppers, but here are the main culprits, the main thing is to catch them early, over wintering a plant will need careful monitoring in the Autumn especially bringing it in into a warmer climate.
Damping Off: Most seedlings are potentially susceptible to this, fungus attack on the new thin stems fairly close to the base, weakening and thinning of stem and then plant collapses, not much can be done although there are treatments to water in before it happens but generally it is time to dispose of plant. Always plant in clean trays with good compost and clean water to start, a watering of a copper fungicide may also help prevent attack.
Slugs & Snails: Like fresh new growth to snack on, some damage can be limited by watering in the morning as slugs are most active at night and are most efficient in damp conditions. They also dislike venturing over rough and sharp ground such as shingle, sharp sand or even fine wood mulch, coffee grains also act as a deterrent. Seaweed if available puts them off with the salt content, so a mulching of this may well help, or try a beer trap as they are quite partial to a bevvy. Set a small amount of beer in a shallow wide jar buried in the soil up to its neck, slugs will crawl in and drown, as they are attracted to the yeast and barley in the beer.
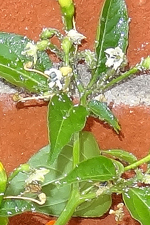
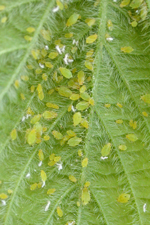 Aphids: These small bodied pests are a hazard throughout the whole growing season, but watch out as they seem to like the small fresh plants in the Spring. Sap-feeding insects, infest plants, especially on the shoot tips, flower buds and the underside of younger leaves. The foliage may be sticky due to the sugary honeydew that aphids excrete. growtips3A black sooty mould often develops on the honeydew. White cast aphid skins often accumulate on the upper leaf surface or soil beneath where the aphids are feeding. Aphid damage can result in stunted growth with curled/crinkled or distorted leaves. Sooty mould and cast aphid skins. Numerous sprays, dusts and soaps are available to help remove them which are quite effective especially when caught early, they also have natural enemies, including ladybirds which are available as biological control.
Red spider mite: Common pest in the greenhouse in hot dry conditions, causing leaf discolouration and affecting growing adversely. Glasshouse red spider mite can be difficult to control as it breeds rapidly in warm conditions and some strains of the mite have developed resistance to some insecticides. Biological control is an attractive alternative to using insecticides, but again there are plenty available.
Grey Mould: Irregular watering may cause brown sunken areas on the chillis which will in turn go soft and mouldy. Always keep chilli plants well spaced, well ventilated and well watered, always removing dead or dying plants leaves or stems.
Leaves Yellowing: Nutrient deficiency, give the plants a liquid feed such as seaweed.
Blossom End Rot: Usually caused by erratic watering, or too much nitrogen, the tips of the fruits will appear brown which will work up the fruit and go all mushy, remove fruit and give a calcium feed, and try to keep a regular watering regime.
Harvesting
Check your variety for the mature pod size and then as they reach full size, the pod should feel firm and look fairly glossy, if it still feels soft to the touch it is still immature.
 Pods can be picked early but they really need to be fully developed to develop their full flavour and heat. The best time to pick chillis for drying is just when they start to change colour. This picking will stimulate the plant to produce more flowers and eventually chillis, and the picked chillis will continue to ripen as they dry, even totally green chillis may ripen to completely red after being picked. Picked chillis will stay fresh for up to 2 weeks in the refrigerator if kept in a sealed container. When using some of the hotter chillis they are best prepared wearing gloves when removing the seeds and inner pith, as any contact with the skin afterwards will cause burning when you touch your face or any other delicate parts, which is inevitable, take my word for it, washing with water afterwards will not remedy the situation. Drying is the oldest and most common way to preserve chillis. Avoid any damaged, pitted or marked chillis as they may mould before drying and infect others. On a dry hot day spread the chillis out on a metal container to collect the heat, which will speed up the process, or string them up through their stalks and hang out. Here in the UK we have successfully dried out string of chillis in about 2 weeks, weather depending, if the weather turns out bad midway through gather them up and lay on a metal sheet on top of the boiler or hang in the airing cupboard . A quicker way is simply to buy a home dehydrator which will speed things up. Once completely dried store in airtight bags in the dark or remove the seeds and grind down either to a fine powder or coarse flakes.
Saving Seeds: Keep a couple of ripe chillis for next years crop. Hang the chillis in a dry atmosphere and then when dried out, collect all the seeds and seal in an envelope, label up and keep in a dry cool dark place for following year. Unless you have only grown one type of chilli in your greenhouse, or isolated a species, it is likely that most of your plants will have cross pollinated especially the annums, therefore the following year will not give a true variety. Germination may not be as high as bought treated seeds but enough seeds from a couple of plants should yield a satisfactory number of plants for the next season, if you're only growing for enjoyment and culinary uses, does it really matter if you get a slightly different cross pollinated strain. The degree of cross pollination, will be influenced by a number of factors, closeness of plants, amount of insects and if growing outside wind conditions, to ensure no cross pollination occurs plants must be completely isolated or grown with some kind of mesh canopy.